Better portraits: light, distance, height, pose and expression
Key points
- Let light come from the side or behind, not straight overhead, and step into shade at midday.
- For close-ups of faces, step back and zoom in rather than moving in close, so the face isn't distorted.
- Instead of ‘smile’, give people something to do: walk, talk, look at each other. Natural expressions follow.
The difference in portraits comes less from the price of the camera than from a few habits. Work through light, distance, height, pose and expression, and even phone photos improve dramatically.
1. Light: check the direction first
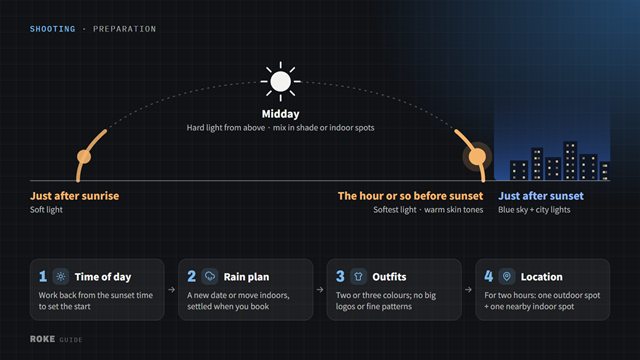
- Avoid harsh midday sun — Light falling from overhead casts deep shadows under the eyes and nose. Step into the shade of a building or tree and the light spreads evenly.
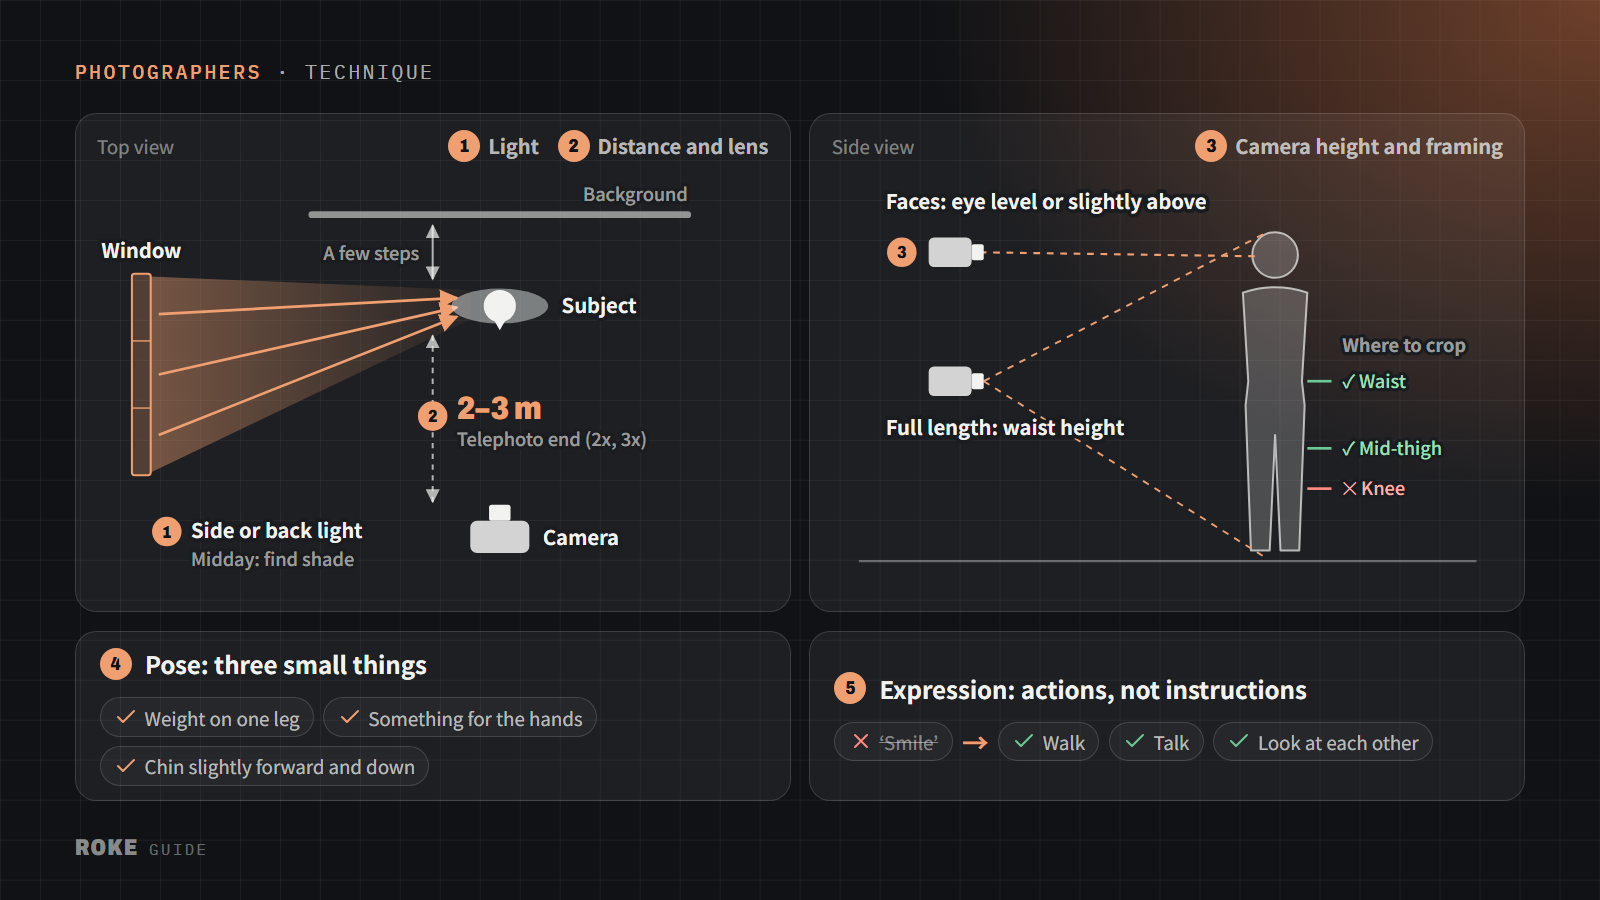
- Side light — Light falling on one side of the face adds depth. It's why indoor photos taken by a window look good.
- Backlight — With the sun behind the person, their hair is rimmed with light and they aren't squinting, so they relax. If the face is too dark, expose for the face or bounce light back with a white wall or reflector.
- The hour or so before sunset — Low, warm light makes skin look its softest.
2. Distance and lens
- Close and wide distorts — Getting close to a face with a wide-angle lens makes the nose look bigger and stretches people at the edges of the frame.
- Step back and zoom in — For face-focused shots, stand about 2–3m away and use the telephoto end; proportions look natural and the background tidies up. On a phone, use zoom levels that have a real telephoto lens (2x, 3x and so on) and avoid digital zoom beyond that.
- Move away from the background — Stand the person a few steps from the wall or background and it blurs, making them stand out.
3. Camera height and framing
- Eye level or slightly above — Eye level is the default for faces. Shooting from below emphasises the chin and nostrils.
- Low for full-length shots — Lower the camera to about waist height for full-body shots and legs look longer. Don't cut off the feet.
- Don't crop at joints — A frame edge at the wrists, knees or ankles looks awkward. Crop between joints, such as mid-thigh or at the waist.
- Space in the direction of the gaze — Leave more room on the side the person is looking toward so the frame doesn't feel cramped.
4. Pose: three small things
- Weight on one leg — Standing evenly on both feet looks stiff. Shift weight to the back leg and bring the front foot forward slightly.
- Something for the hands — A pocket, a collar, hair, a cup or the other person's hand gives the hands something to hold and reduces awkwardness.
- Chin slightly forward and down — The jawline looks sharper and double chins show less.
5. Expression: actions, not instructions
Few people smile naturally when told to ‘smile’. Give them something to do and the expression follows.
| Expression you want | Try saying |
|---|---|
| Natural smile | Face each other and tell me what you had for breakfast |
| Big laugh | On three, try tickling each other |
| Relaxed profile | Walk slowly to the end over there, chatting as you go |
| Calm mood | Close your eyes, then slowly open them on three |
| Children | Where's Mum's nose? (ask it like a game) |
Shoot in bursts and you can pick the most natural moment. For walking or running shots, a fast shutter speed (roughly 1/250 s or faster) reduces blur.
Shooting on a phone
- Clean the lens — A smudged lens makes the whole photo hazy.
- Lock focus and exposure — Press and hold on the face to lock focus and exposure, then adjust the brightness.
- Check edges in portrait mode — Hair and glasses frames can get smeared, so zoom in to check.
- Turn on the grid — It makes horizons and framing easier to get right.
Before the shoot, check the day's sunset time and which direction the sun sets in. Once you decide where the sun goes, you know where to stand.
Basis and sources
General portrait techniques put together by the ROKE editorial team.